Description:
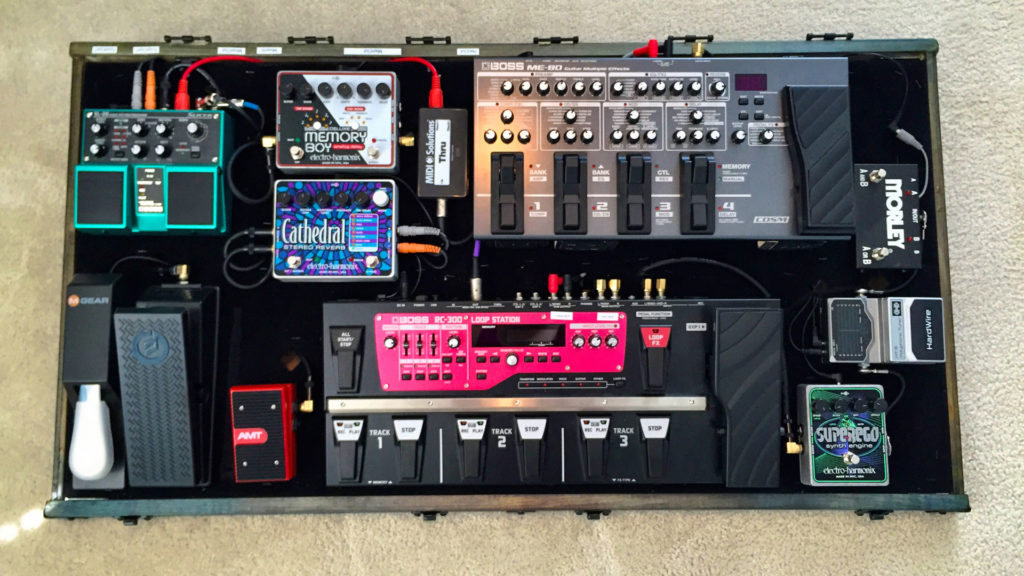
This custom pedalboard was a personal build created to solve a practical problem: keeping a large collection of effects pedals organized, protected, powered, and ready to play without rebuilding the setup every time it moved. Since most of my work is digital, projects like this are especially rewarding because they turn planning, design, and problem-solving into a physical object I can actually use.
The goal was to create a self-contained pedal housing that could be transported, opened, plugged in, and ready within minutes. It needed to hold the pedals securely, manage cables cleanly, provide easy access to power and audio connections, and still feel like a finished object rather than a rough utility box.
Project Credits:
Company: °a light beacon
Tools Utilized:
3D Studio Max, Photoshop, Saws, Drills, Sandpapers, Polyurethane, Time
Contributions:
Concept and Project Planning, 3D Layout, Woodworking, Physical Build
Pedalboard In Progress
This project started as a way to eliminate the setup friction that comes with moving a large pedal chain. Reconnecting pedals, troubleshooting cables, and rebuilding signal paths can quickly kill the mood for playing. The idea was to build one organized, prewired system that stayed intact between uses.
Modeling the Monster
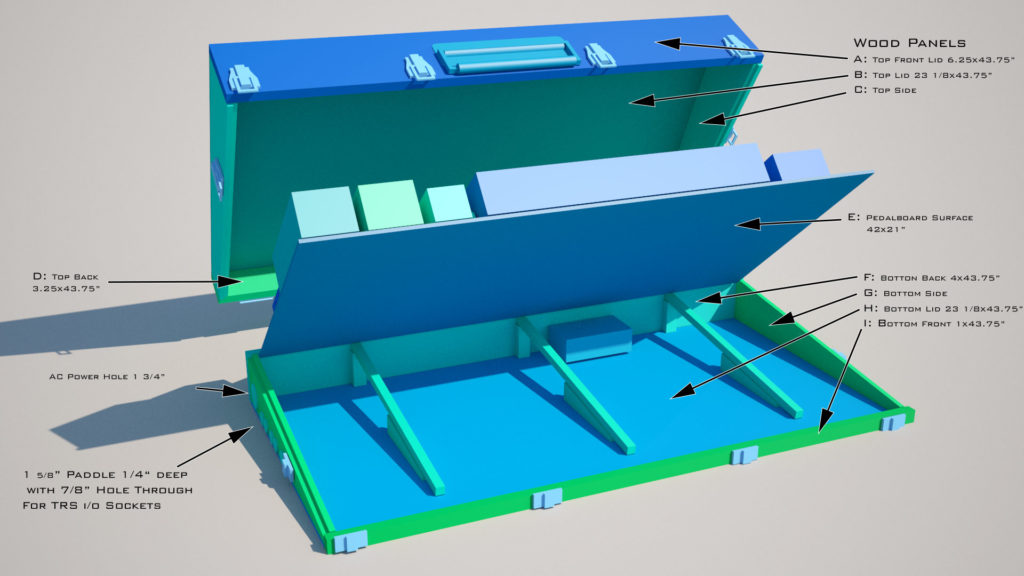
Before cutting any wood, I built a simple 3D layout in 3ds Max to test the size, spacing, and configuration of the board. The model did not need detailed materials or lighting; it only needed to represent accurate volumes. This helped confirm the dimensions, pedal placement, cable clearance, and overall layout before making any expensive cuts.
I also created paper stand-ins for each pedal so I could quickly test different arrangements by hand. This combination of digital planning and physical mockups made it easier to find a layout that balanced density, usability, and space for cables and fingers.
Building and Finishing
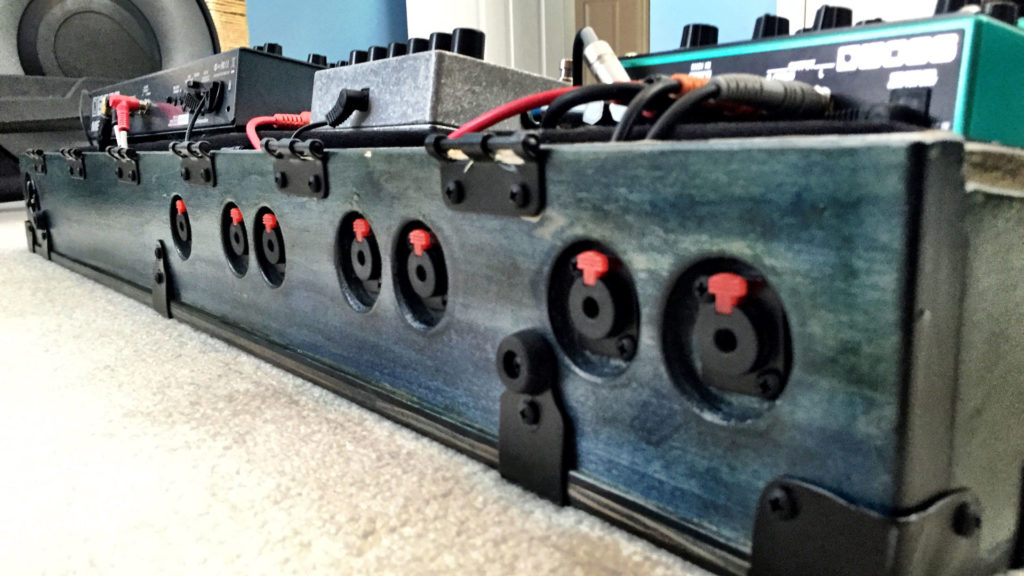
This was my first time tinting wood and attempting a hand-sanded fade effect. I used blue dye instead of stain because dye penetrates more deeply and can create a richer, more interesting finish. After building up several strong layers of color, I sanded back the center area by hand to create a subtle fade toward the edges.
The oak bottom accepted the finish much better than the birch top, which was chosen mostly because it was available and had a clean surface. If I built it again, I would likely use oak or maple throughout. One design change from the original model was moving the input/output ports from the side to the back for better structural integrity. The final satin polyurethane coat is what really brought the finish to life.
Adding Hardware
The final stage involved adding hardware, loop carpet for Velcro-mounted pedals, internal wiring, and built-in power access. I wanted the board to function as a complete system, so devices and power could be connected from the outside without needing to open everything up.
The goal was a setup time of roughly five minutes. For any venue or playing situation, avoiding loose pedals, tangled cables, and repeated troubleshooting makes the whole system far more practical.
Final Result
The finished pedalboard works exactly as intended: a portable, prewired pedal box that keeps the full effects chain organized and ready to use. It solved the problem that inspired the build and became a satisfying mix of planning, woodworking, electronics, and practical design.
For anyone interested in the build details, I also created a PDF with plans, materials, and sources for the parts used.
Detailed Specs:
Hardware Needed
- 4x lift-off hinges for lid
- 3x hinges for pedal surface
- 8x rubber feet
- 8x corner covers
- Marinco power input connector — 1.75″ hole
- 6x lid latches
- 6x TRS I/O ports — 1 5/8″ Forstner, 1/4″ deep with 7/8″ hole
- 3 sq. yds. cabinet carpet
Wood Needed
Top & Bottom Panels
- 2x 24″ x 48″ boards
- Thickness: 0.25″
- Depth: 23.125″
- Length: 43.75″
Front Panels
- 1x kiln-dried 1″ x 8″ x 48″ board
- Actual size: 0.75″ x 7.25″
- Cut 1″ down the length to create the two front boards
- Front Top: 6.25″ x 0.75″ x 43.75″
- Front Bottom: 1″ x 0.75″ x 43.75″
Back Panels
- 1x kiln-dried 1″ x 8″ x 48″ board
- Actual size: 0.75″ x 7.25″
- Cut 4″ down the length to create the two back boards
- Back Top: 3.2″ x 0.75″ x 43.75″
- Back Bottom: 4″ x 0.75″ x 43.75″
Side Panels
- 2x kiln-dried 1″ x 12″ x 24″ boards
- Actual size: 0.75″ x 11.25″
- Cut length to 21.5″
- Make angled cut from 4″ up at the back corner down to 1″ at the front end
- Outer cheek of rabbet should face inward for bottom panels
- Trim top panel height after rabbeting; both panels should be 7.25″ tall
- Top Side Cut: 3.543″ back to 6.25″ front x 0.75″ x 21.5″
- Bottom Side Cut: 4″ back to 1″ front x 0.75″ x 21.5″
Pedal Surface
- Attaches with hinges for access to bottom storage
- Size: 42″ x 21″
- Thickness: 0.25″
Pedalboard Features
- 42″ x 21″ interior pedalboard surface
- Storage under pedalboard surface
- Stained polyurethane hardwood enclosure
- AC power cable input
- Mounted internal power supply area
- TRS I/O for stereo mixer out
- TRS I/O for stereo mixer in
- TRS I/O for expression pedal A
- TRS I/O for expression pedal B
- TRS I/O for sustain pedal out
- TRS I/O for instrument 1
- TRS I/O for instrument 2
Pedals & Equipment
- Hardwire Tuner
- Moog EP1
- AMT EXP
- M-Audio Sustain Pedal
- EHX SuperEgo
- EHX Memory Boy Deluxe — 12.06 x 14.6 x 6.35 cm
- EHX Cathedral — 12.06 x 14.6 x 6.35 cm
- Hardwire HT6 Tuner — 8.89 x 13.97 x 5.58 cm
- Morley ABY — 13.33 x 8.25 x 5.08 cm
- Boss RC-300 — 53.6 x 23.1 x 7.6 cm
- Boss ME-80 — 44.7 x 23.1 x 7 cm
- Boss SL-20 — 17.3 x 15.8 x 5.7 cm
- Voodoo Lab Pedal Power 3